
Most businesses don’t exist solely online—people talk in real life. Customers recommend products to family and friends, business folk discuss deals over the phone or at a conference, etc. While this is good, it presents a problem for marketers—they rarely track offline conversions and touchpoints properly.
When building your marketing performance reports, you could be missing measurable activity due to offline conversion gaps. Including them will create a more complete picture of marketing effectiveness across the customer journey.
We’ll teach you how in this guide, covering:
- What are offline conversions?
- Why track offline conversions?
- Setting up Google Ads offline conversion tracking
- Enhanced conversions for leads in Google Ads
- Offline conversion tracking for other platforms
- Why single-platform offline tracking is only part of the solution
- Unifying offline and online data for multitouch attribution
Key Takeaways:
- Offline conversion tracking bridges the gap between digital ads and real-world actions, providing a more accurate view of ROI.
- Automating the process and integrating with your CRM is essential for scalability and accuracy.
- No single-platform solution gives the full picture—cross-channel, multi-touch attribution and centralized data systems are key.
What Are Offline Conversions?
Offline conversions are business activities that occur outside digital channels but are influenced by online marketing.
While offline conversions may be prominent in B2C models through influencer marketing or referral programs, they are crucial in B2B services, account-based attribution, SaaS customer journeys, high-value products, and complex sales cycles.
Why? These business models use account-based marketing strategies involving sales calls, in-person meetings, or conferences, which are key for closing deals and influencing conversions.
Why Track Offline Conversions?
In the above business models, tracking offline conversions fills a measurement gap and offers a complete picture of ROI. Let’s illustrate an example:
A SaaS company sells enterprise-level cybersecurity software with a lengthy sales cycle involving IT, finance, and executive management. The journey includes online interactions like website visits, webinars, or downloading resources, and offline interactions like sales meetings, product demos, trade shows, and phone calls.
The marketing team uses digital analytics (like GA4) to track website interactions, seeing strong engagement from webinars and white papers. But because many crucial steps happen offline, relying solely on online data leaves a substantial visibility gap.
If a deal closes months later, marketing struggles to attribute the closed sale to initial online touchpoints.
By tracking offline conversions, marketing teams can create a “hybrid funnel” of offline and online interactions. This approach allows the company to accurately attribute revenue to marketing activities, capture ROI, and make better-informed marketing decisions.
By tracking offline and online conversions together, Livestorm achieved a 3x increase in ROAS and improved their LTV:CAC by 3x in one year.
Book a Demo
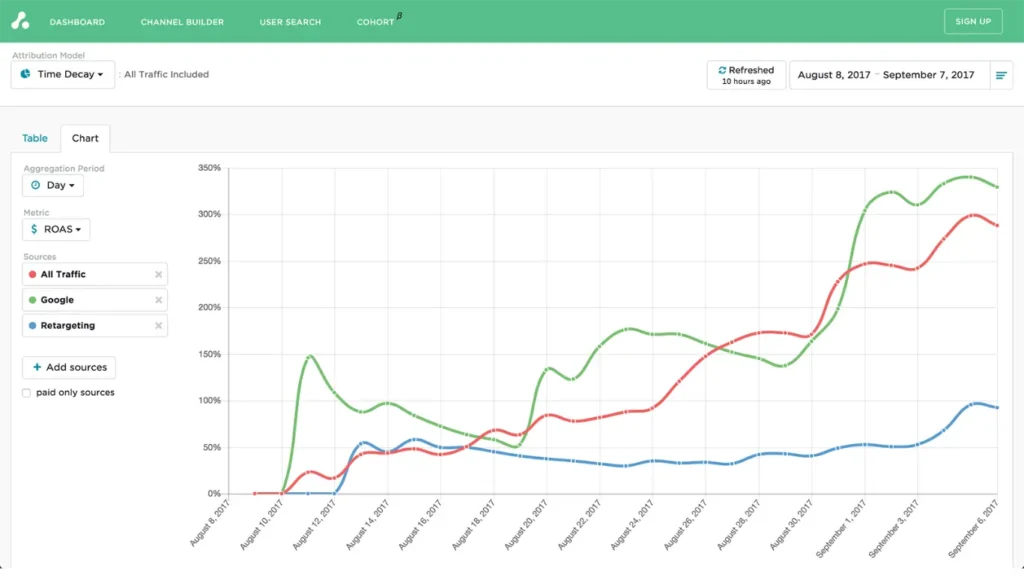
Understand the precise impact of each marketing touchpoint and track “true” CAC, ROAS, and ROI on marketing spend with The Attribution Platform.
Challenges of Traditional Offline Conversion Tracking
Marketers struggle with three major issues for offline conversion tracking.
The first is data silos between marketing platforms, conversion tracking software, and CRM systems—reflecting separation between sales and marketing teams. With data silos, you’ll find it difficult to match marketing data to customer profiles, leaving you unable to build meaningful customer journeys.
The second issue is attribution timing when conversions happen long after initial clicks from online campaigns. Some deals can take weeks or months to close after initial awareness. Traditional platforms like Google Analytics can’t track these long cycles.
The last major issue is the technical hurdle of matching offline events, like phone calls and meetings, to online touchpoints. A key factor is the lack of common identifiers. Offline interactions often lack consistent identifiers like user IDs or cookies present in online activities.
These issues can make offline conversion tracking seem overwhelming and difficult to set up—but we can show you how in just five steps below.
Setting Up Google Ads Offline Conversion Tracking
Google Ads is often the starting point for offline conversion implementation for a few reasons:
- It has direct CRM integrations to import offline conversion data.
- It has a solid tracking structure with tools like gclid (Google Click ID).
- It uses optimized bidding based on real outcomes.
- It already has industry prevalence.
Companies already rely on Google Ads for lead generation, so it becomes a logical first channel for improving measurement and to get results fast (see our guide on measuring ROAS and ROI on Google Ads for more info).
The gclid parameter in particular is critical for connecting online clicks to offline events. It’s appended to your landing page URL whenever someone clicks a Google ad, uniquely identifying that click and session.
When a lead fills out a form or contacts your business, you can capture the gclid along with their details and store it in your CRM. When that lead converts offline, upload the glid back to Google Ads to attribute the original ad click.
Let’s walk through how to set that up.
Step 1: Enable Auto-Tagging in Google Ads
Here are the steps to enable auto-tagging in Google Ads:
- Sign in to your Google Ads account.
- Click the Admin icon (wrench symbol) in the top-right corner.
- Select “Account settings” from the dropdown menu.
- Click on the “Auto-tagging” section.
- Check the box next to “Tag the URL that people click through from my ad.”
- Click “Save” to apply the changes.
This process appends the gclid to your ad URLs. This step is critical for linking ad clicks to user interactions on your website.
Note that you might encounter a couple of issues at this stage:
- Using manual UTM parameters with auto-tagging can cause data discrepancies in GA4. If you need to use both, make sure GA4 prioritizes gclid over manual tagging (this should be the default, but double-check).
- URL redirects can remove the gclid from URLs, leading to data loss. Configure your server to pass the GCLID through to the final landing page.
- Some websites or Content Management Systems (CMS) don’t handle arbitrary URL parameters well. Click on a live ad to check if the parameter is in the URL; if not, ask your web developer to allow arbitrary URLs.
Step 2: Capture and Store Click IDs
After enabling auto-tagging, you’ll need a method to capture the click ID from the URL, store it (usually in a cookie), and capture it via a hidden form field during lead submission. There are a couple of ways to achieve this:
Add a hidden field to your form
- WordPress (e.g., Gravity Forms):Add a hidden field to your form.Enable “Allow field to be populated dynamically.”Set the parameter name to gclid.
- HubSpot:Create a new contact property named gclid.Add this property as a hidden field in your form.
- Other Platforms:Ensure your form builder allows adding hidden fields.Name the hidden field gclid to match the URL parameter.
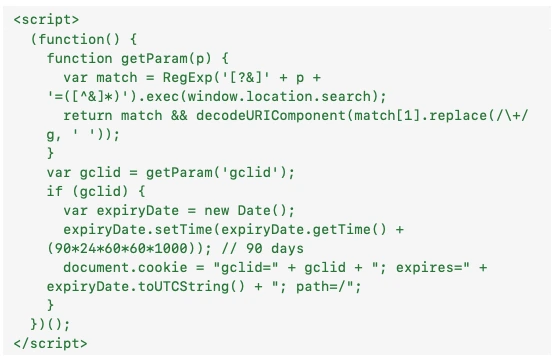
Add JavaScript code to capture click ID from URL and store it in a cookie
Here’s an example script that captures the parameter and stores it in a cookie for 90 days (in line with a 90-day attribution window):
Use code to populate a hidden field with the click ID from the cookie:
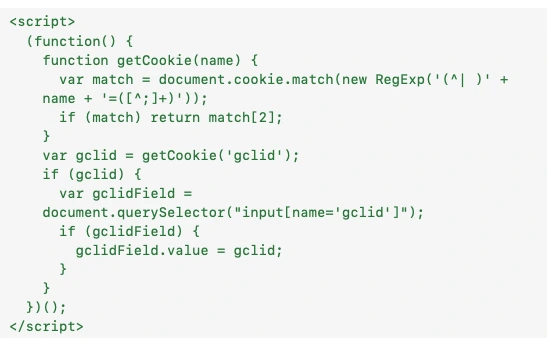
This script should retrieve the gclid value from the cookie and populate the hidden form field before form submission.
After the user submits the form, you need to make sure your CRM stores the data. Use a CRM integration with Google Ads if available:
- Make sure your form submission process includes the gclid field.
- Map the gclid field to a corresponding field in your CRM (e.g., a custom field named GCLID).
If you’re using another database, include the gclid value in the data insertion process for later retrieval and matching with offline conversion events.
Due to privacy regulations like GDPR and CCPA, you must inform users about cookie use and gain explicit consent for data tracking.
Step 3: Create an Offline Conversion Action in Google Ads
After setting up the data collection backend, create an offline conversion action in Google Ads to attribute offline events to your campaigns. Here’s how:
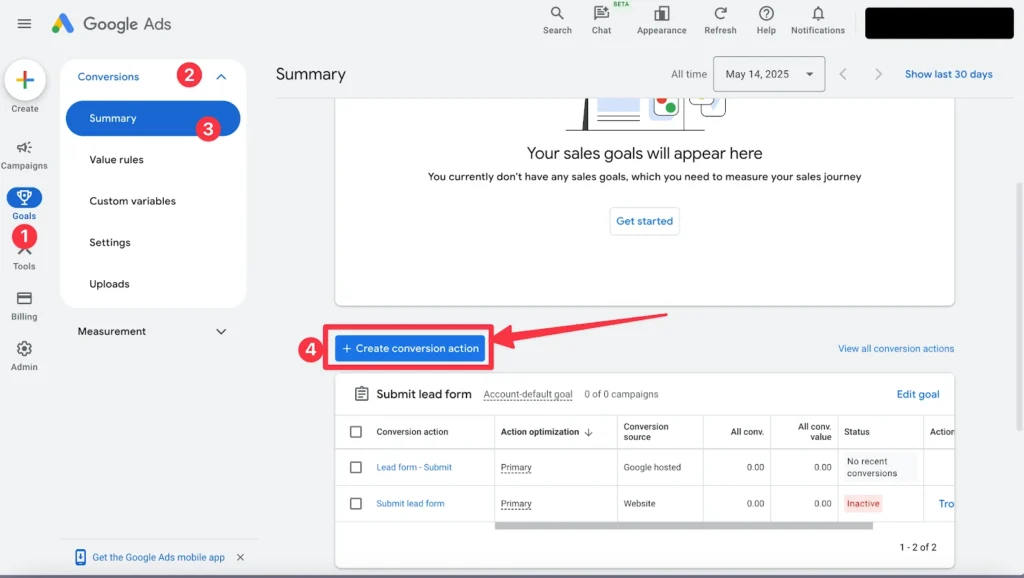
- Sign into your Google Ads account.
- Access Conversion Actions by clicking the “Goals” icon (trophy symbol) > under “Measurement,” click “Conversions” > Click “Summary.”
- Create a new Conversion Action by clicking the blue “+ New Conversion Action” button.
- Select the Conversion Source, and choose “Import”.
- Choose “CRMs, files, or other data sources,” then choose “Track conversions from clicks,” > “Continue.” If you don’t have a data source set up yet, you should click “Connect a new data source” and follow the on-screen instructions for your data source.
- Configure your Conversion Action settings:
- Name—needs to exactly match data uploads.
- Category—Select the category that best describes your conversion (e.g., “Lead”, “Purchase”, “Sign-up”).
- Value—Choose how to assign a value: Use the same value for each conversion. Use different values for each conversion. Or Don’t use a value.
- Count—Decide how to count conversions. Every: Counts every conversion after an ad interaction, suitable for sales. One: Counts only one conversion per ad interaction, suitable for leads.
- Click-through conversion window—Defines how long after an ad interaction a conversion can be recorded. For offline conversions, a longer window (up to 90 days) is often appropriate to capture delayed actions.
- Include in “Conversions”—Determines if the conversion action is included in the “Conversions” column, which can affect automated bidding strategies.
- Attribution models—Last Click: Attributes the conversion to the last ad clicked. Data-Driven: Uses machine learning to distribute credit across multiple touchpoints.
- Review your settings then click “Create and continue.”
Step 4: Prepare and Upload Conversion Data
With the basic infrastructure in place, start preparing and uploading your conversion data in CSV format with the following columns:
- Google Click ID (GCLID): The unique identifier for the ad click, essential for linking the offline event to the online ad interaction.
- Conversion Name: The name of the conversion action as defined in your Google Ads account—any discrepancy will cause upload errors.
- Conversion Time: The date and time of the conversion. Ensure it’s after the ad click time and within the allowable conversion window (typically up to 90 days).
- Conversion Value (optional): The monetary value associated with the conversion.
- Conversion Currency (optional): The currency code (e.g., USD, GBP) for the conversion value.
Keep these formatting tips in mind:
- Date and Time: Use the format YYYY-MM-DD HH:MM:SS in 24-hour time.
- Time Zone: Ensure it matches your Google Ads account settings.
- No Extra Columns: Avoid adding unnecessary columns or personal information.
With the CSV file ready, upload it:
- Open Google Ads and go to “Conversions” by clicking the tools and settings icon (wrench symbol) > Measurement > Conversions.
- Upload conversions by clicking the “Uploads” tab and hitting the “+” button to add a new upload > choose your file source > select your CSV file.
- Upload it, then it should appear in the “Pending actions” table.
- In the “Actions” column, click “Apply” to import the conversions.
You might run into a few errors during this process. Here are some common ones and troubleshooting tips:
– Missing or Invalid GCLID: Make sure each GCLID is correctly captured and matches the format provided by Google Ads.
– Conversion Name Mismatch: Verify that the conversion name in your CSV exactly matches the one in your Google Ads account, including case sensitivity.
–Conversion Time Issues: The conversion time must be after the ad click time. If it’s before, Google Ads will reject the entry.
–Duplicate Conversions: Google Ads ignores duplicate conversions. Ensure each conversion is unique or necessary duplicates are intentional.
–File Format Errors: Make sure your CSV file has no extra columns, missing headers, or unsupported characters.
For detailed error troubleshooting, Google has a guide in the help center.
Step 5: Automate the Process
You probably wouldn’t want to manually repeat the last step regularly—if so, automate the process. There are three main approaches you can take, each suit particular teams or circumstances more:
1. Using the Google Ads API.
If your business has technical expertise, the Google Ads API offers a good solution. You need access to the API and a developer to set up and maintain the integration, but it offers real-time or scheduled uploads and supports enhanced conversions for leads by including hashed user data.
2. Using a no-code automation tool such as Zapier.
For non-technical teams, Zapier offers an accessible solution. You can automate the import of offline conversions from your CRM to Google Ads by connecting the CRM to Zapier and creating a Zap that triggers on specific CRM events (like lead status change) to send the conversion data to Google Ads.
It’s a no-code option that supports real-time data transfer, but it’s a paid service and you’ll need to make sure Zapier supports your CRM.
3. Using native integrations.
Some CRMs like HubSpot and Salesforce offer native integrations with Google Ads. This approach provides a streamlined setup with real-time data syncing, suitable for most business sizes and technical resources.
Following the steps above, you’ll see your offline conversion data in Google Ads and get a better picture of overall performance.
Enhanced Conversions for Leads in Google Ads
When setting up your conversion actions, you might have noticed the box for the “Enhanced Conversions for Leads” option in the setup. This feature improves the accuracy of tracking offline conversions from online leads.
Unlike standard offline conversion tracking, which relies solely on the Click ID, this method uses hashed first-party customer data, like email addresses or phone numbers, collected from your website’s lead forms. This data is securely matched with Google accounts to attribute conversions more accurately, even without cookies.
Setup Process and Requirements:
- Enable Enhanced Conversions: In your Google Ads account, navigate to Tools and Settings > Conversions. Select or create a conversion action, then expand the “Enhanced conversions” section and check the box to turn it on.
- Configure Tagging: Use Google Tag Manager or the global site tag to capture lead form data. Make sure that the data is hashed using SHA-256 before being sent to Google.
- Import Conversion Data: When a lead converts offline (e.g., makes a purchase), upload the hashed data back into Google Ads to attribute the conversion to the original ad interaction.
There are pros and cons for using enhanced conversions or manual offline conversion tracking:
- Enhanced Conversions for Leads:
- Pros: Simplifies setup by reducing the need for manual data handling, improves match rates by using multiple identifiers, and provides more accurate and timely conversion data.
- Cons: Requires proper configuration of tagging and data hashing, and it’s dependent on the quality and completeness of collected first-party data.
- Manual Offline Conversion Tracking:
- Pros: Offers full control over data collection and upload processes and suitable for businesses with complex CRM systems.
- Cons: More labor-intensive, higher error risk, and potential data availability delays.
It might not be easy to determine when to use either approach, but here’s a quick pointer for each:
- Enhanced Conversions for Leads is ideal for a more automated and privacy-conscious method to track offline conversions, especially with a high volume of leads and you’re aiming for improved attribution accuracy.
- Manual offline conversion tracking may be better if your business has specific data handling requirements or if integrating automated solutions isn’t feasible due to technical constraints.
Offline Conversion Tracking for Other Ad Platforms
Google Ads isn’t the only ad platform you might be using (or considering using)—two other popular choices are Meta (Facebook) and Microsoft Ads:
Meta (Facebook): Uses the Facebook Click ID (FBCLID) and hashed customer data (e.g., email, phone) to match offline events to ad engagements. Data can be uploaded via CSV or through the Conversions API for automation.
Microsoft Ads: Uses the Microsoft Click ID (MSCLKID) to associate offline conversions with ad clicks. Advertisers upload conversion data through the Microsoft Advertising interface or API, including details like conversion time and value.
There are a few issues you might run into in terms of cross-platform attribution, including disparate identifiers and data formats across platforms that can complicate unified attribution.
Implementing a centralized system that captures all relevant identifiers and integrates with each platform’s API can improve cross-platform tracking accuracy.
Why Single-Platform Offline Conversion Tracking is Only Part of the Solution
Relying on a single platform for offline conversion tracking can lead to fragmented data. Each ad platform, like Google Ads, Meta, or Microsoft, has its own ecosystems, preventing a holistic view of the customer journey.
You’ll also find that platform-specific attribution models, like last-click or first-click, tend to oversimplify the customer journey by assigning credit to a single interaction. This trust in single-touch attribution can lead to misinformed budget and strategy development.
Manual data entry processes are also error-prone and can delay data availability, affecting real-time decision-making.
To avoid these limitations, consider using multi-touch attribution models that include online and offline interactions (we’ve got an article on GA4 alternatives that covers other potential options here). A data platform that aggregates data from various sources can provide a more comprehensive understanding of your customer’s behavior.
Unify Online and Offline Data for Multi-Touch Attribution
Unified multi-touch attribution is a measurement approach that combines data from your marketing channels to credit key touchpoints along the customer’s journey, rather than single interactions.
You can build a bespoke attribution model for your business to achieve this, but it would cost significant time and resources.
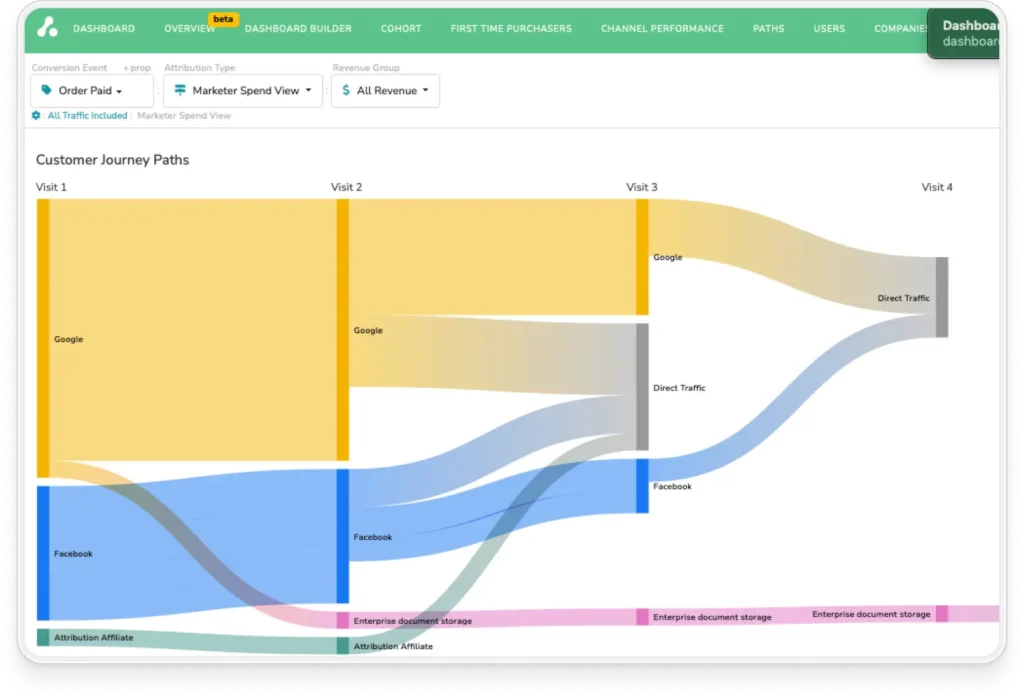
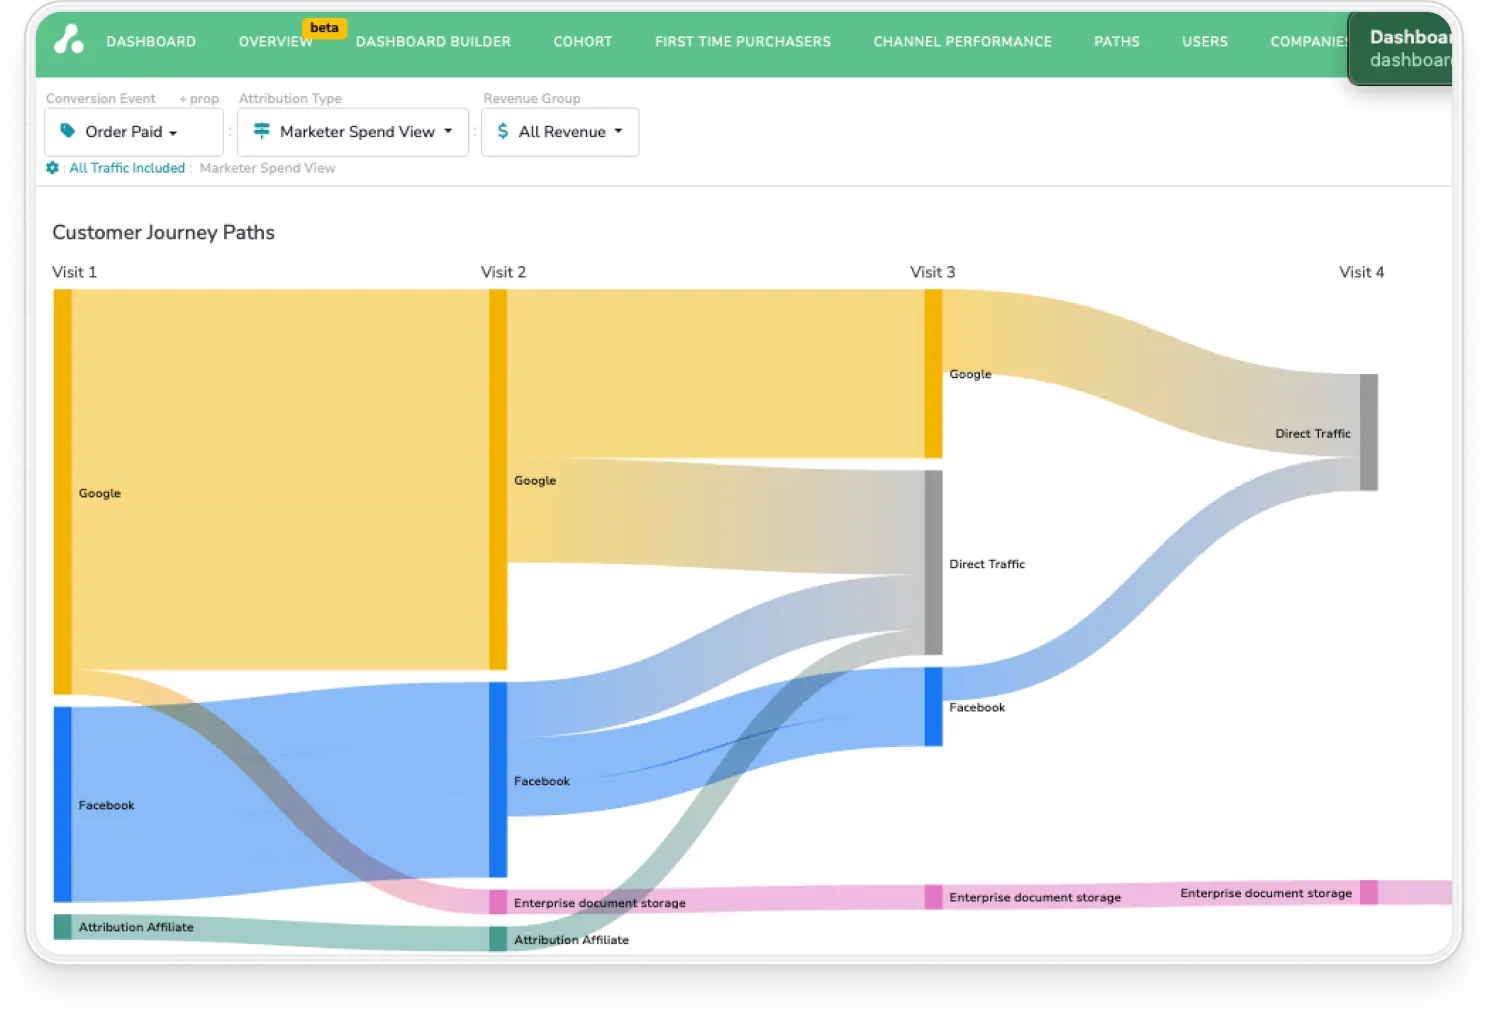
The Attribution Platform is a dedicated multi-touch attribution solution that integrates with key sales and marketing tools like Google Ads, HubSpot, Salesforce, and Pipedrive to capture online and offline conversion data.
Combining online and offline data lets you track the entire customer journey for full-funnel attribution and cost data alongside each touchpoint in a single dashboard. This data provides insights into real-time CAC, CAC Payback, LTV:CAC, and ROI—which you can analyze at channel and user-specific levels.
Sign up and try Attribution today — pinpoint CAC by channel, audit funnels and conversion rates, scale revenue-driven content marketing, measure affiliate LTV and CAC (and more).
Offline Conversions FAQs
How do I track phone calls as offline conversions?
You can add offline conversions manually to your ad platform using a CSV file, or integrate your CRM and ad platform with The Attribution Platform.
How long should my conversion window be for offline conversions?
Allow 90 days for offline conversion windows; this considers long or complex sales cycles with offline activity.
Can offline conversion tracking work for brick-and-mortar retail businesses?
Yes—you can capture customer identifiers like phone numbers, emails, loyalty card data, or transaction IDs at the point of sale. Then you can match these offline purchases to prior online ad interactions via click IDs or hashed data matching.